We should enable the guest account, and set the following settings:
Firstly,enable Guest account in Local Users and Groups
Step 1: In the Start menu or taskbar search box, type Lusrmgr.msc and then press Enter key to open Local Users and Groups.
Step 2: Here, on the left-side, under Local Users and Groups (local), click Users.
Step 3: Next, in the middle pane, double-click on Users to view all user accounts on our Windows 10.
Step 4: Right-click the Guest and then click Properties or double-click on Guest to open its properties.
Step 5: To enable the Guest account, under the General tab, uncheck the option titled Account is disabled. In the full name field, type in a name for the account if you wish to have a different name for the account, and then click Apply button to enable the guest account.

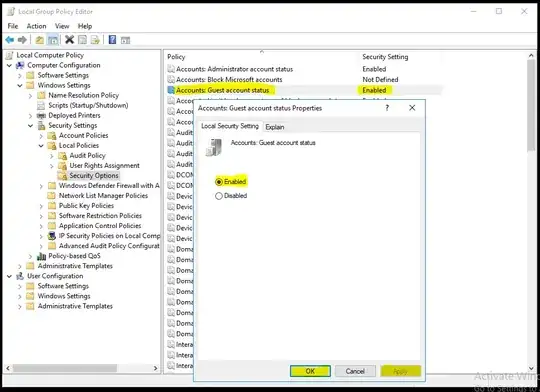
Secondly, enable Guest account via Group Policy
Step 1: Open Group Policy Editor, by typing Edit Group Policy in the Start or taskbar search box and then pressing Enter key.
Step 2: In the Group Policy Editor, navigate to the following policy:
Computer Configuration > Windows Settings > Security Settings > Local Policies > Security Options.
Step 3: On the right-side, look for the policy labelled Accounts: Guest account status and double-click on the same to open its properties.
Step 4: Select Enabled option and then click Apply button to turn on the Guest account in Windows 10.
Thirdly, set "Deny log on locally" via Group Policy
Step 1: In the Group Policy Editor, navigate to the following policy:
Computer Configuration > Windows Settings > Security Settings > Local Policies > User Rights Assignment.
Step 2: On the right-side, look for the policy labelled Deny log on locally and double-click on the same to open its properties.
Step 3: Click Guest option and then click Remove button.
Step 4: Then click"Apply" and "OK".