3

How do I sort search result by size in Finder? I would prefer some sort of setting, or shell plug-in. I'm using this to clean my hard drive by finding and deleting the largest files first.

I'm not going to go into the terminal every time I want to do this.

Journeyman Geek
  • 127,463
  • 52
  • 260
  • 430
Dave
  • 31
  • 2

4 Answers4

6

Actually, it is possible to do this, with a little trickery. You need to edit the Finder's preference file to turn on the options that the View Options panel's disabled buttons equate to.

alt text

To accomplish this, you need to edit the com.apple.finder.plist preferences file which should be located in the following folder:

/Users/~/Library/Preferences/

I use Property List Editor.app, which is part of the Xcode developer tools. There are also third-party applications that can do this, though I can't recommend any off the top of my head.

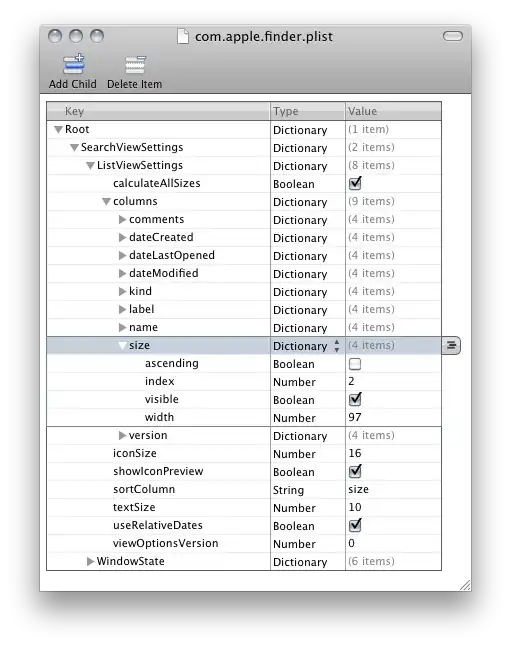
The image below shows the key paths for the search view settings. By default, the SearchViewSettings > ListViewSettings > columns > size > visible flag is turned off. Check the box, then save your changes. Preferably, you should edit this preference file while the Finder has been quit, but enabling that behavior is a bit more involved. It should be sufficient to save the preference file and then Control-Option-click on the Finder's icon in the Dock and choose Relaunch.

alt text

Also note that by default, Spotlight doesn't search for "System files" or invisible items. System items means items that are located in any of the /Library folders. To allow searching for these items, choose Other… in the popup menu of parameters to search for, then add "System files" and "File visibility".

NSGod
  • 1,808
  • 13
  • 13
  • Nice find. The path is confusing though, either `/Users/yourname/` or `~/`, but not both. – Daniel Beck Jan 10 '11 at 22:11
  • I'm writing an entry for the Super User Blog about Spotlight and some features and hacks. Would you be okay with me including your answer in it, of course with proper credit? – slhck May 25 '11 at 15:26
2

To set this preference easily using the command line, open /Applications/Utilities/Terminal and enter the following:

/usr/libexec/PlistBuddy -c "Set :SearchViewSettings:ListViewSettings:columns:size:visible true" Library/Preferences/com.apple.Finder.plist

Do not edit this post to prevent scrolling. Triple-click selection is easier this way.


Alternatively, you can always search for files larger than a specified file size (Size is one of the Other... attributes you can search for), or within a range. This way, you can view files larger than 1GB first, then those between 500M and 1G, etc. alt text


I'd still suggest you use a tool designed for the job, such as the one Stephen Jennings mentioned, DiskInventoryX or (commercial) DaisyDisk.

Daniel Beck
  • 109,300
  • 14
  • 287
  • 334
  • Cool, you found `PlistBuddy` on my system! :P And you can use >`` to quote code withtout scrolling still maintaining the triple click. Also, I've found another good alternative to DaisyDisk... – cregox Apr 09 '11 at 19:27
1

Just use Secrets #37777 and you'll get same result from NSGod.

Another option is using 3rd party tools such as Find Any File.

But to clear up the machine of big files, I prefer things like Grand Perspective or maybe DiskRadar - apparently a cheaper (in the good and bad sense) alternative to DaisyDisk suggested by D. Beck:

cool and useful interface

Going yet another step further away from the original question but into the original problem, just recently I also used with high satisfaction Chipmunk to reclaim 40gb of wasted duplicates, without any big effort. It has a very distinctive way for looking at the dupes which helps a lot, but it ain't cheap (U$16.99):

cregox
  • 5,804
  • 7
  • 49
  • 66
  • Result's the same because for this secret (and most "secrets"), *Secrets* is just a fancy UI for the same operation. – Daniel Beck Apr 09 '11 at 07:51
  • @Daniel yep. That's what I meant! And I trust most mac users love fancy UIs. Specially the ones that are well crafted and save time even from Terminal experts. :) – cregox Apr 09 '11 at 12:32
  • 1
    I use Secrets myself, just wanted to clarify that no third party software is needed here, if not desired. Using `defaults` might be the best option, but I haven't figured out how yet. – Daniel Beck Apr 09 '11 at 12:43
  • @Daniel that's because there seems to be [no easy way](http://www.dreness.com/blog/?p=6) to achieve it using `defaults`. It's still not meant to handle nested plists. And I don't have `PlistBuddy` on my system. – cregox Apr 09 '11 at 19:07
  • `man PlistBuddy` gives its path as `/usr/libexec/PlistBuddy`, which exists on my standard 10.6 installation. I experimented a bit and incorporated it into my answer. – Daniel Beck Apr 09 '11 at 19:16
  • Nice find. I'm a happy DaisyDisk customer, but will also try that one. – Daniel Beck Apr 09 '11 at 19:48
  • 2
    I finally came around to trying Disk Radar. I don't like it at all, it looks and feels like a cheap clone of DaisyDisk with a few features (disk health using SMART, but not even as headless background application AFAICT). It doesn't handle used/free space on sparse disk images properly. It doesn't allow listing the "small" files and folders. For some reason, likely their partial window transparency, leads to mouse wheel scrolling leaking over to the window below. – Daniel Beck Jun 04 '11 at 11:41
  • @Daniel thanks for the quick review! I really haven't used both Daisy or Radar long enough to spot all those differences. I just tried 'em and they seemed both all right. Now, recently what I have used to claim 40gb back without having to trash anything valuable, was chipmunk. That's a great deduper. Now, let me update the answer... – cregox Jun 04 '11 at 19:44
0

I know this isn't a direct answer to your question, but OmniDiskSweeper is great for cleaning your hard drive. You pass it a drive or folder and it will display the total size of each folder, letting you drill down to find out what's using all the storage.

OmniDiskSweeper in use

Stephen Jennings
  • 23,171
  • 5
  • 72
  • 107